
Easter cakesicles are one of the most searched spring treats right now — and once you see what they look like, it’s easy to understand why. These chocolate-coated, cake-filled popsicle-shaped desserts are showing up on every Easter table, gift basket, and party spread. They look impressively professional, but with the right tools and a little patience, they’re completely doable at home.
Whether you’re planning a festive Easter brunch, putting together a gift basket, or just want a fun kitchen project to do with the kids, this guide covers everything you need: what they are, how to make them, the best design ideas for Easter, and tips for decorating, packaging, and even selling them.
What Are Easter Cakesicles (And How Are They Different From Cake Pops)?
If you’ve ever wondered about the difference between cake pops and cakesicles, you’re not alone — it’s one of the most common questions people ask before diving in.
Cake pops are small, round cake balls coated in chocolate or candy melts, served on a thin lollipop stick. They’re compact, two-bite treats that have been popular at parties and bakeries for years.
Cakesicles, on the other hand, are shaped like a popsicle — flat, rectangular or oval, and filled from the inside. Instead of dipping a cake ball into coating, you fill a popsicle mold with melted chocolate, let it set, then pipe cake filling inside, seal it with a chocolate layer, and pop it out. The result is a thicker, sturdier dessert with a more polished finish and a better chocolate-to-cake ratio.
For Easter specifically, cakesicles win on visual impact. Their flat surface gives you more room to pipe designs — bunny faces, Easter eggs, floral patterns, or pastel swirls — using colored chocolate or royal icing. That decorating real estate is what makes them such a standout Easter treat.
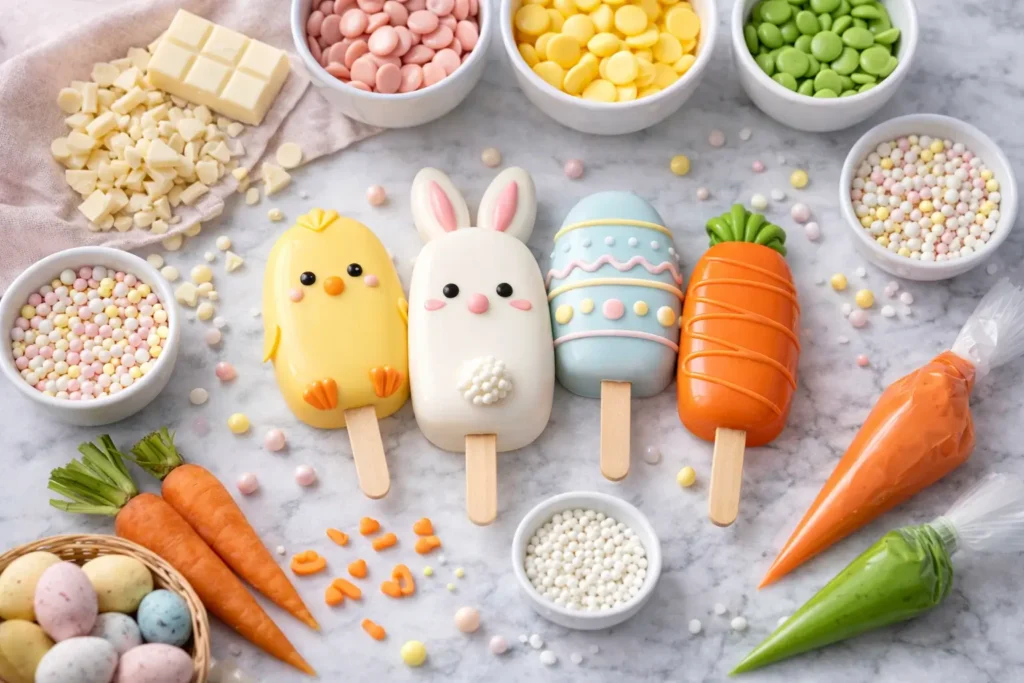
What You’ll Need to Make Easter Cakesicles
You don’t need a professional kitchen setup to pull these off, but a few specific tools do make the process much smoother.
Tools:
- Cakesicle molds (silicone popsicle molds, available online or at craft stores)
- Popsicle sticks
- Small paintbrush or pastry brush (for spreading the chocolate layer)
- Piping bags or squeeze bottles
- Microwave-safe bowls
- Offset spatula
- Toothpicks (for swirling or fixing details)
Ingredients:
- Candy melts or high-quality white or dark chocolate — white chocolate is ideal for Easter because it takes food coloring easily
- Baked cake — any flavor works; boxed cake mix is perfectly fine
- Frosting — around ⅓ to ½ cup per full batch of cake crumbles; store-bought works well here
- Gel food coloring (pastel purple, yellow, green, and pink are the classic Easter palette)
- Sprinkles, edible glitter, or sugar pearls for decoration
For frosting, a classic cream cheese frosting works beautifully inside cakesicles — it adds richness without making the filling too dense.
How to Make Easter Cakesicles: Step by Step
Step 1 — Bake and crumble your cake
Bake a standard 9×13 cake (any flavor — see flavor ideas below) and let it cool completely. Once cooled, crumble the cake into fine crumbs using your hands or a fork. There should be no large chunks — the texture should resemble wet sand.
Step 2 — Mix in your frosting
Add frosting to your cake crumbs gradually, mixing with a spoon or your hands. You’re looking for a consistency that holds together when pressed but isn’t sticky or wet. Start with ¼ cup of frosting, then add more if needed. Over-frosting is the most common mistake — too much and the filling will be dense and greasy.
Step 3 — Melt and color your chocolate
Melt your candy melts or white chocolate according to package directions, working in 30-second microwave bursts and stirring between each. If coloring white chocolate, use gel food coloring only — water-based liquid food dye can cause chocolate to seize and become unusable.
For Easter, you can divide your melted chocolate into separate bowls and tint each one a pastel color. Pastels are achieved by adding just a small amount of gel color at a time and mixing well.
Step 4 — Shell your molds
Using a small pastry brush or the back of a spoon, coat the inside of each popsicle mold cavity with a layer of melted chocolate. Make sure it’s even and covers all the way to the edges — this is your outer shell. Tap the mold gently on the counter to remove air bubbles. Insert your popsicle stick about halfway into the mold, then refrigerate for 5–8 minutes until set.
Step 5 — Fill with cake mixture
Once the shell is set, fill each cavity about ¾ full with your cake filling. Gently press it in but don’t pack it too tightly — you need to leave room to seal the back.
Step 6 — Seal and chill
Spoon or pipe melted chocolate over the open back of each mold, spreading it to the edges with an offset spatula to create a smooth seal. Refrigerate for at least 20 minutes, or until fully set.
Step 7 — Unmold and decorate
Gently flex the silicone mold and pop each cakesicle out. The chocolate shell should release cleanly. If any edges are rough or uneven, you can smooth them with a warm offset spatula. Now they’re ready to decorate.
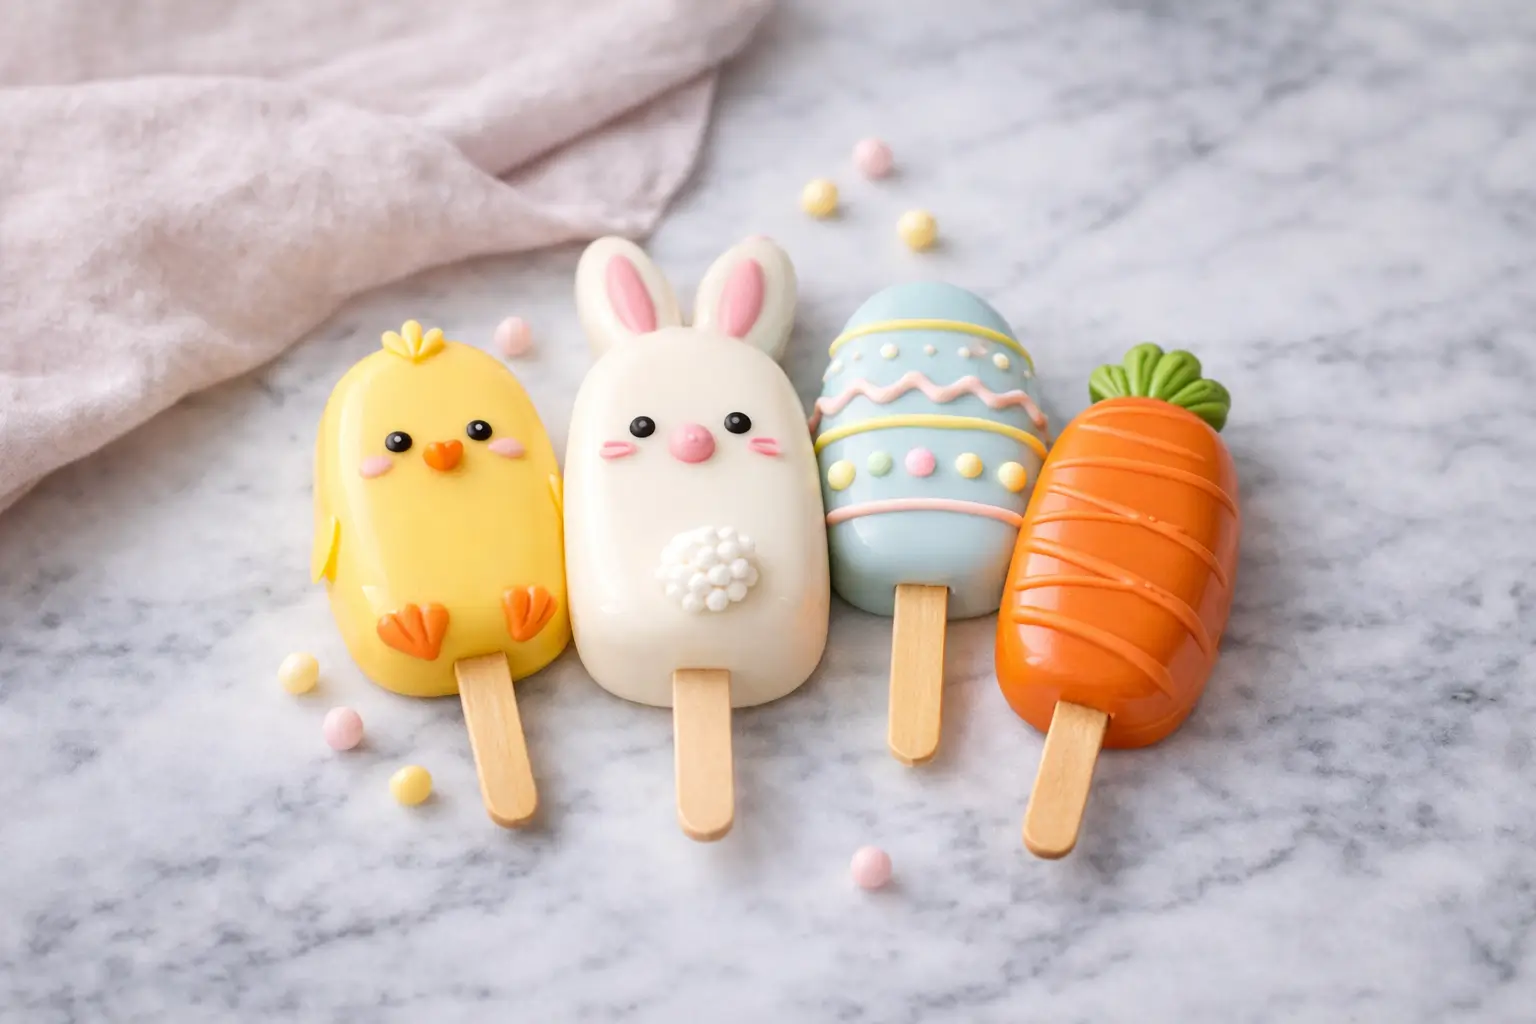
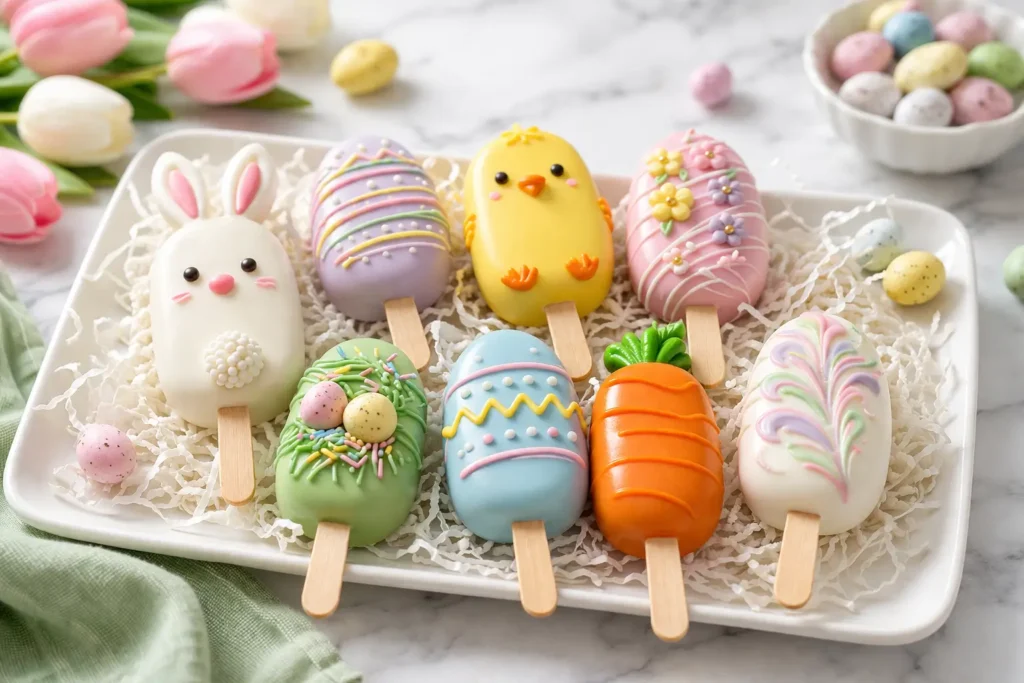
6 Easter Cakesicle Design Ideas
This is where the fun really starts. The flat surface of a cakesicle is like a little canvas — and Easter gives you so many adorable directions to take it.
Easter Bunny Cakesicles use a white chocolate base with piped bunny ears on top. Add a small pink circle nose, tiny chocolate chip eyes, and a white chocolate fluff tail. Pastel pink or lavender backgrounds work especially well here.
Easter Egg Cakesicles start with a solid pastel base, then get decorated with stripes, zigzag lines, or dots using contrasting colored chocolate. A piping bag with a small round tip gives you the most control, and no two need to look the same — the variation is part of the charm.
Easter Chick Cakesicles start with a yellow candy melt base. Pipe a small orange triangle beak and two tiny candy eyes, then add a few feathery lines in a slightly deeper yellow for texture. These are some of the simplest Easter cakesicles to execute and consistently look adorable.
Carrot Cakesicles use an orange chocolate base with a green chocolate top at the narrow end to represent the carrot leaves. These pair perfectly with an actual carrot cake filling and are always a crowd-pleaser at Easter parties.
Speckled Egg Cakesicles are a more grown-up look. Start with a pastel base, let it set, then use a thin food-safe brush dipped in cocoa powder mixed with a small amount of water. Flick the brush gently over the surface to create natural-looking speckles that mimic a real quail or robin’s egg.
Floral Spring Cakesicles use a white or soft mint green base with small five-petal flowers piped using a star tip and pastel yellow, pink, or lavender chocolate. Simple and elegant — these are perfect if you’re making cakesicles as an Easter gift.
Best Flavor Combinations for Easter Cakesicles
The inside of a cakesicle can be as creative (or as simple) as you like. Here are some combinations that work particularly well for Easter.
| Cake Base | Frosting Pairing | Notes |
|---|---|---|
| Vanilla | Strawberry buttercream | Light and springy |
| Lemon | Cream cheese frosting | Bright, fresh flavor |
| Carrot cake | Cream cheese frosting | Classic Easter pairing |
| Funfetti | Vanilla buttercream | Great for kids |
| Chocolate | Chocolate ganache | Rich, crowd-pleasing |
| Strawberry | Vanilla buttercream | Pairs with pink shells |
A lemony filling inside a lavender cakesicle is one of the most popular combinations this season — the flavor and color pairing both scream spring. The shell-and-fill technique used here is actually quite similar to what goes into hot chocolate bombs — both rely on building a chocolate shell in a mold and sealing it with a second layer.
Tips for Perfect Easter Cakesicles Every Time
A few things make a real difference in how professional your cakesicles turn out. Properly tempered chocolate sets with a glossy finish and a clean snap — if you’re using candy melts, this step isn’t necessary, as they’re designed to set without tempering. Each layer needs to be fully set before you move to the next; rushing leads to cracked shells or filling that pushes through the seams.
Keep your filling on the drier side — a slightly drier filling is always better than an over-frosted one. If your filling is too wet, the inside becomes greasy and may crack the shell from the inside as it contracts. Always use gel coloring when working with melted chocolate, since water-based food dye will cause it to seize. And if your kitchen runs warm, work in short sessions and return the molds to the fridge between steps.
How to Package Easter Cakesicles as Gifts
One of the best things about easter cakesicles is how well they present as gifts. Individual cellophane bags tied with a pastel ribbon are simple, elegant, and easy to transport. A small Easter basket lined with crinkle paper with 4–6 cakesicles arranged upright looks beautiful without much effort. For a more polished look, kraft paper boxes with a clear window are available at most craft stores and give a bakery-style feel.
For teachers, neighbors, or coworkers, individually wrapped cakesicles with a small handwritten tag make thoughtful and budget-friendly Easter gifts. They’re also a lovely addition to an Easter dessert table alongside other spring dishes — deviled eggs make an easy savory complement, and a festive birthday-style cake can anchor the sweet side of the table alongside your cakesicles.
How to Store Easter Cakesicles
Easter cakesicles can generally be stored at room temperature in a cool, dry location for up to 3–4 days, or in the refrigerator for up to a week. If refrigerating, place them in an airtight container to prevent condensation from forming on the chocolate surface, which can cause blooming — a white, streaky appearance that doesn’t affect taste but does affect presentation.
For longer storage, you can freeze cakesicles for up to one month. Wrap each one individually in plastic wrap before freezing, and allow them to come to room temperature slowly — still wrapped — before serving, to prevent condensation.
How Much Should You Charge If You Sell Easter Cakesicles?
If you’re considering selling easter cakesicles, pricing will vary depending on your location, ingredients, and the complexity of your decorations. As a general reference point, handmade cakesicles in the US commonly retail anywhere from $5 to $12 per piece, with custom or heavily decorated designs falling at the higher end of that range.
When calculating your price, it’s worth factoring in the cost of molds, sticks, candy melts, cake ingredients, packaging, and your time. Custom orders — like themed or monogrammed designs — typically command a premium. Local baking groups and platforms like Etsy can give you a sense of what sellers in your area are charging.
What Cake Is Traditionally Eaten at Easter?
While cakesicles are a modern treat, Easter has a long tradition of celebratory cakes. In the US, carrot cake is by far the most widely associated cake with Easter — its natural pairing with the season and its spring-ready flavor make it a perennial favorite. Simnel cake is traditional in the UK and Ireland, a spiced fruit cake with a layer of marzipan. Some European traditions also feature lamb-shaped sponge cakes or honey cakes as part of the Easter table.
For a modern Easter dessert spread, you might pair your cakesicles with a simple strawberry shortcake or lemon loaf — something light and bright that complements the richness of the chocolate shell.
What Are Good Snacks for Easter?
Easter party food doesn’t have to be complicated. Beyond cakesicles, some of the most popular Easter snacks include deviled eggs, mini carrot sticks with hummus, Easter-themed charcuterie boards with pastel fruits, rice krispie treats shaped like Easter eggs, lemon bars, and pastel-colored sugar cookies. Cakesicles work especially well as the showstopper item on an Easter dessert table because of their visual impact — they tend to get photographed before they get eaten.
Frequently Asked Questions About Easter Cakesicles
What’s the difference between cake pops and cakesicles?
Cake pops are round cake balls dipped in chocolate and served on a stick. Cakesicles are popsicle-shaped, built inside a mold, and have a hollow chocolate shell that’s filled with cake mixture. Cakesicles have more surface area for decorating and tend to have a better ratio of chocolate shell to filling.
What are good snacks for Easter?
Some popular Easter snack ideas include deviled eggs, mini sandwiches, fruit skewers, lemon bars, pastel sugar cookies, and of course, Easter cakesicles. For a full table spread, a mix of sweet and savory bites tends to work best.
How much should you sell cakesicles for?
In the US, handmade cakesicles commonly sell for $5 to $12 per piece, depending on complexity and location. Custom designs or themed orders typically fall toward the higher end. It’s recommended to calculate all ingredient and packaging costs before settling on a price.
What cake is traditionally eaten at Easter?
Carrot cake is the most widely associated cake with Easter in the US. In other traditions, simnel cake in the UK and Ireland and lamb-shaped sponge cakes in parts of Europe are also common Easter sweets.
Can I make Easter cakesicles ahead of time?
Yes — Easter cakesicles can be made 3–4 days in advance and stored at room temperature in a cool spot, or up to a week in the refrigerator in an airtight container. They can also be frozen for up to one month.
Do I need special molds to make cakesicles?
Silicone popsicle molds are the standard tool for cakesicles. They’re widely available online and at craft stores, and the flexibility of silicone makes it easy to pop the finished cakesicles out without cracking the shell.
Easter Cakesicles You’ll Actually Want to Make This Spring
- Total Time: 1 hour
- Yield: 10 cakesicles 1x
- Diet: Vegetarian
Description
Easter cakesicles are chocolate-coated, cake-filled popsicle-shaped treats that are as fun to decorate as they are to eat — perfect for Easter parties, gifts, or a festive baking project.
Ingredients
- 1 baked cake (any flavor, cooled and crumbled)
- 1/3 to 1/2 cup frosting
- 300g candy melts or white/dark chocolate
- Gel food coloring (pastel colors)
- Popsicle sticks
- Sprinkles, edible glitter, or sugar pearls
Instructions
- Crumble the cooled cake into fine crumbs.
- Mix in frosting gradually until the mixture holds together.
- Melt candy melts or chocolate in the microwave in 30-second intervals.
- Color chocolate with gel food coloring if desired.
- Coat silicone molds with melted chocolate and insert sticks.
- Chill for 5–8 minutes until set.
- Fill molds with cake mixture, leaving space to seal.
- Cover with more melted chocolate and smooth the surface.
- Refrigerate for at least 20 minutes until firm.
- Carefully unmold and decorate as desired.
Notes
Use gel food coloring to avoid seizing chocolate. Keep filling slightly firm and avoid over-mixing with frosting for best texture and structure.
- Prep Time: 30 minutes
- Cook Time: 30 minutes
- Category: Dessert
- Method: No-Bake/Chilled
- Cuisine: American
Nutrition
- Serving Size: 1 cakesicle
- Calories: 220
- Sugar: 18g
- Sodium: 120mg
- Fat: 12g
- Saturated Fat: 7g
- Unsaturated Fat: 4g
- Trans Fat: 0g
- Carbohydrates: 25g
- Fiber: 1g
- Protein: 3g
- Cholesterol: 25mg
Keywords: easter cakesicles, cakesicles, easter dessert, cake pops alternative, chocolate treats